- Get Started
- User Guide
- How to
- ** How to use event_type category to do more
- How to Activate EventON
- How To Allow Users to Submit Events and Create an Events Listing Page
- How to apply a patch fix
- How to Bulk Update Language Translations Using the Import/Export Tool
- How to cancel addon subscription before auto renew
- How to Deactivate EventON Addon Licenses
- How To Display or Hide the Live Now Icon
- How to Enable Auto-updates for EventON
- How to find your EventON license key
- How to Fix a Broken Sidebar Caused by the EventON Widget
- How To Hide Blank Rows On the Calendar EventTop
- How To Set Up and Use the Filter Bar on Calendars
- How to Set Up Health Guidelines for EventON and Extend It
- How to Setup & Use Custom Fields for Events
- How to setup & use multi data types
- How to Setup Basic Paypal for Events
- How to show past events
- How to show your calendar on external sites using an iFrame
- How To Turn on Sort Options On Your Calendar
- How To Upgrade Your EventON Addon License
- How to Use Hashtags to Link to Event Sections
- How to Use Single Event Data Values
- How to Use the EventCard Designer
- How To Use the EventON Shortcode Executor(ESE) Widget
- How To Use The EventTop Designer
- How To Use the ICS Import Tool
- How to Use Virtual Visible Event End Time for Events with Limited Visibility but Extended Durations
- Using an SMTP Mail Plugin To Solve Email Delivery Issues in EventON
- General
- Basic System Requirements for EventON
- Best Practices Before Doing an Addon Update
- How to Delete Old Events from WordPress Trash Automatically
- How To Upgrade From Lite to Full Version
- I am confused about Event Type categories
- What is the calendar filter
- Why am I unable to proceed with the checkout for addon purchases?
- Troubleshooting
- ** What to check if eventON is not working
- How to debug for PHP code errors
- How to debug Javascript interactive issues
- How to find if an issue is coming from eventON
- How to fix font awesome icons not working on your site
- How to fix style override issues
- Increasing the WordPress Memory Limit
- Troubleshooting Using the Health Check Plugin
- Why is Location Google Map grayed out or not displayed on Event Card
- Virtual Events
- Frequently Asked Questions
- Code snippets
- CODE: To add additional healthcare guidelines
- How to add new social share icons
- How to change “events” slug & rewrites
- How to customize the eventtop date format
- How to hook into eventTop
- How to increase event type category count
- How to load EventON scripts to a page
- How to show additional custom data in the eventCard
- CODEX
- Other
- Tricks and Tips
- ** Override CSS in your calendar
- How to create events that goes past midnight
- How to customize Events archive page
- How to customize location and organizer archive page
- How to override event colors with event type colors
- How to show featured image on eventTop
- How to show various information on the eventTop
- How to translate EventON with WPML on the front-end
- One solution for /events slug not working
- Various Creative Ways to Use Multi Data Types
- APIs
- Addons
- Action User
- ActionUser Paid Feature Events
- ActionUser Plus
- Advent Calendar
- Bookings
- Countdown
- CSV Importer
- DailyView
- Dynamic Pricing
- Event API
- Event Dynamic Pricing
- Event Lists
- Event Map
- Event Photos
- Event Reviewer
- Event Search
- Event Seats
- Event Slider
- Event Tickets
- Auto Complete Ticket Order
- Auto re-stocking refunded, cancelled or failed orders
- Changelog for Event Tickets
- CODE: How to send Emails as Bcc
- How to add additional data to confirmation email
- How to add additional fields at checkout
- How to add additional fields to download attendees CSV file
- How to customize ticket email template
- How to manage capacity separately for repeat events
- How to set up Event Tickets
- How to set up variable prices for Tickets
- How To Switch From WooCommerce Blocks to Shortcode-Based Cart & Checkout Pages
- Event Wishlist
- Filters Plus
- FullCal
- ICS Importer
- Include Anything
- Lists & Items
- Moon Data
- PDFer
- Polls
- QR Code
- Reminders
- Repeat Customizer
- RSS Feed
- RSVP Events
- RSVP Events Invitees
- RSVP Events Waitlist
- RSVP Points
- Single Events
- Speakers & Schedule
- Subscriber
- Sync Events
- Tickets Waitlist
- Variations & Options
- Virtual Plus
- Weather
- WeeklyView
- YearlyView
- Policies
- Server Related
- Shortcode
- Translation & Languages
Best Practices Before Doing an Addon Update
Last Updated: August 31, 2023
We frequently release updates for our addons, which may include new features or essential security patches. To safeguard your website from potential disruptions or unexpected errors during or after the update, it’s crucial to create a backup.
In this tutorial, we’ll go through various ways you can do a backup of your whole site. We’ll also cover how you can backup the current version of an EventON addon before an update in case backing up your whole website is not an option.
Let’s get started.
1. Full Site Backup
There are three primary methods to backup your entire website:
- Using a Plugin: This method allows you to easily backup your site directly from your website’s dashboard.
- Through Your Hosting Dashboard: This is a more direct approach, where you can backup your site from the control panel provided by your hosting provider.
- Using FTP: This is a manual approach where you download copies of plugins and themes and store them locally on your computer.
Using a Plugin
Backing up your WordPress site using a plugin is a straightforward and efficient method, especially for those who may not be technically inclined. Plugins are designed to automate the backup process, ensuring that all your website data, including posts, pages, comments, and settings, are safely stored. While many backup plugins are available for free, some offer advanced features, such as off-site cloud storage, which come with a price tag. To get started, simply install and activate your chosen backup plugin from the WordPress repository. Here are a couple of plugins that you can use for this purpose:
- UpdraftPlus: This plugin allows you to backup and restore your website with ease. Please go through this guide for more details about the process.
- BackupBuddy: This plugin offers scheduled backups, off-site storage options, and more. Please go through this guide for more details.
- Duplicator: This plugin not only helps in backing up but also in migrating WordPress sites. Please go through this guide for more details.
- VaultPress (now part of Jetpack): This plugin provides a subscription-based protection, security, and backup service. Please go through this guide for more details.
- BackWPup: This plugin offers a free and premium version that supports backups to Google Drive, Rackspace Cloud, SugarSync, Microsoft Azure, and Amazon Glacier. Please go through this guide for more details.
Using Your Hosting Dashboard
To backup your WordPress website via the hosting dashboard, first, log in to your hosting account’s control panel. Most hosting providers, like Bluehost, SiteGround, or cPanel-based hosts, offer a “Backup” or “Backup Wizard” option. Navigate to this section, and you’ll typically find options to create a full website backup, which includes all files, databases, and configurations. For the purpose of this tutorial, you can backup your files ONLY before doing the update and perform a restore through the wizard if anything breaks after an update. Here are some tutorials from the most common hosts:
- How to backup with SiteGround
- How to backup with GoDaddy
- How to backup with Hostinger
- How to backup with Bluehost
- How to backup with Hostgator
- How to backup with WPEngine
Using FTP
To backup your entire website using FTP (File Transfer Protocol), you’ll first need an FTP client like FileZilla or Cyberduck. You can find your FTP login credentials from your hosting dashboard. After connecting to your website using your FTP credentials, navigate to the root directory of your site. From here, select all files and directories and download them to your local computer. This process effectively creates a local backup of your website.
For added security, it’s wise to store this backup on an external hard drive or a secure cloud storage service. You can perform a local backup anytime you are updating EventON or WordPress.
2. Backing Up a Single EventON Addon
In certain situations, you might want to avoid the hassle and time-consuming process of backing up your entire website just for a single addon update. In these instances, there are two primary methods to backup the addon itself:
- Using a plugin: You can install a plugin on your WordPress site to facilitate the download of the plugin from your dashboard.
- Using FTP: You can connect to your site via FTP and create an archive of the addon or clone and rename the addon.
Using a plugin
You can install the WP File Manager plugin on your site and use this to navigate the file system on your site and download copies of the installed plugins on your site. Please follow these steps:
- Install and activate WP File Manager by going to WP Dashboard > Plugins > Add New.
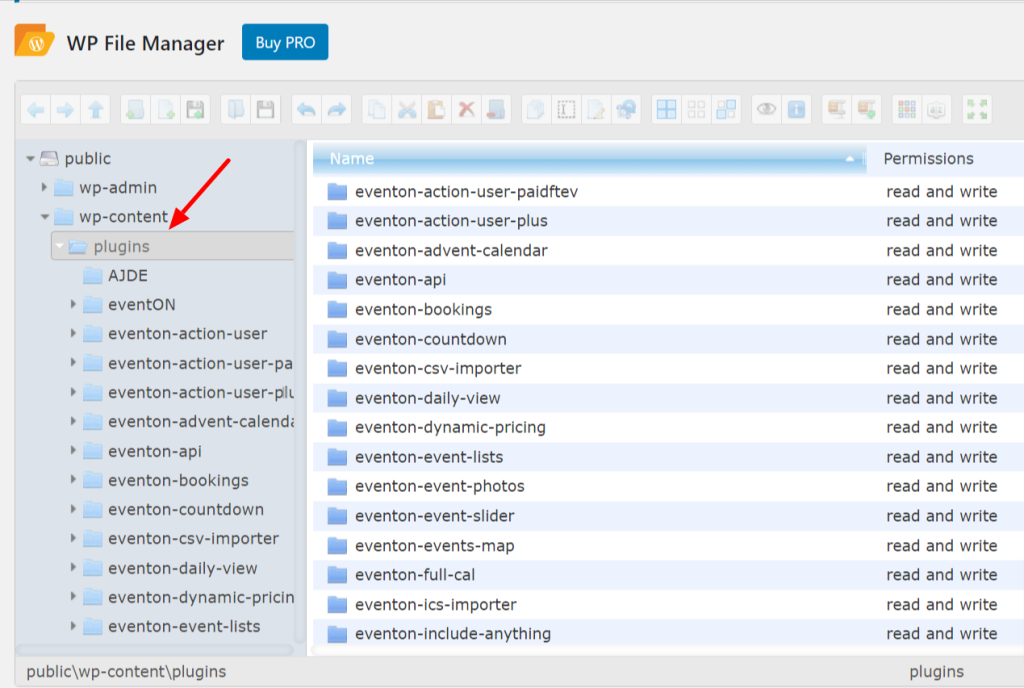
- Once the plugin is activated, navigate to WP File Manager and go to the public/wp-content/plugins folder as shown below:

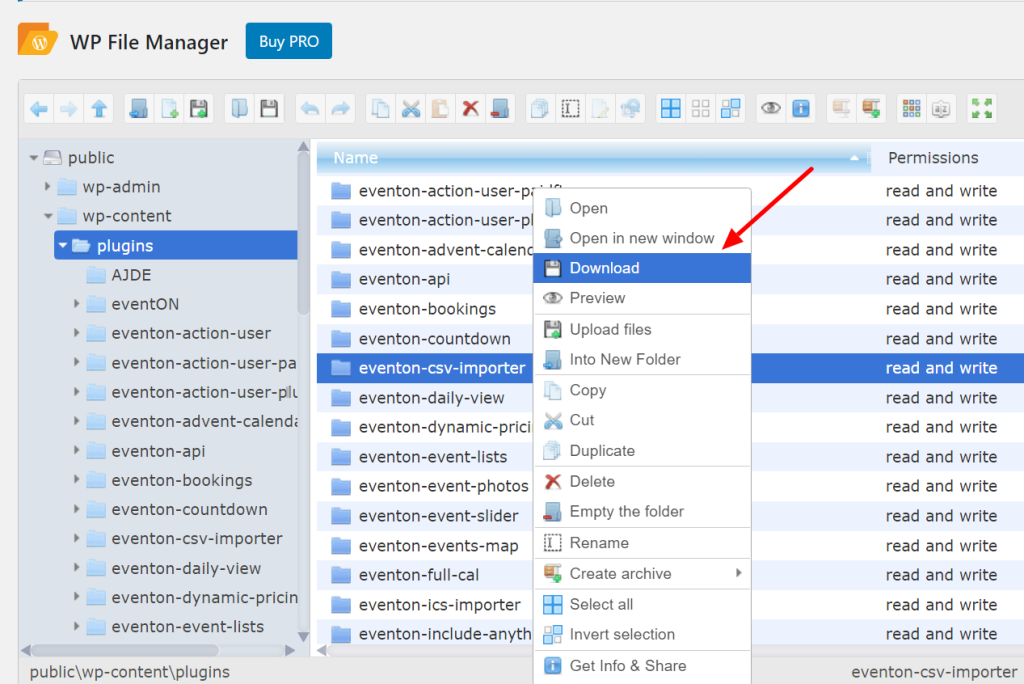
- Select the plugin/addon that you’d like to backup, right-click, and select Download from the context menu as shown below:

- This will download a zipped copy of the addon which you can store locally on your computer.
- Alternatively, you can select the option to Create archive and store the backed-up version in the same wp-content folder. In case an issue arises, you can delete the plugin folder and unzip the backup.
- Go ahead and update the addon, if anything breaks, you are covered and you can easily roll back to the downloaded version by deleting the installed copy and installing the old version.
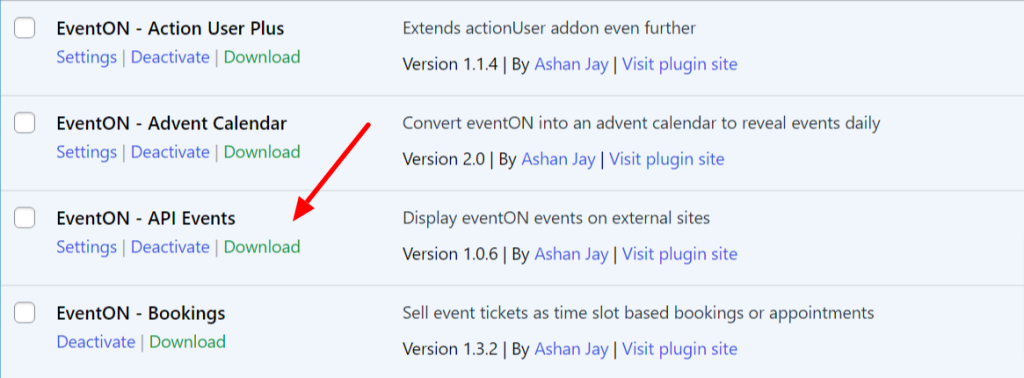
Alternatively, you can install the Download Plugin from the WordPress repository and use it to download any EventON in just a few clicks. You can follow these steps:
- Install and activate WP File Manager by going to WP Dashboard > Plugins > Add New.
- Once the plugin is installed, go to WP Dashboard > Plugins and click the Download link to generate a zipped copy of the addon. Here is a screenshot:

Using FTP
You can download a copy of one of your installed EventON addons by following these steps:
Access cPanel:
- Open your web browser and navigate to your website’s cPanel login URL. Typically, it’s in the format: http://yourwebsite.com/cpanel or https://cpanel.yourwebsite.com.
- Enter your cPanel username and password to log in. Please get in touch with your host if you would like help getting these credentials.
Navigate to the File Manager App:
- Once logged in, look for the “File Manager” icon and click on it. This will open the file directory of your website.
Locate the Plugin Directory:
- In the File Manager, navigate to the public_html directory (or the directory where your WordPress is installed).
- Inside, locate and open the wp-content folder.
- Within this folder, locate the addon that you want to backup.
Download the Plugin:
- Right-click on the plugin folder and select “Compress” from the dropdown menu. Choose the “Zip” format and give the compressed file a name if you wish.
- Once the zipping process is complete, right-click on the newly created zip file and select “Download.”
Store Safely:
- Save the downloaded zip file to a secure location on your computer or an external storage device.
And that’s it! You’ve successfully downloaded a zipped version of a WordPress plugin from cPanel. In case any issue arises after the update, you can roll back by deleting the currently installed version of the addon and installing the backup copy.
Did this article help you?
- General
- Basic System Requirements for EventON
- Best Practices Before Doing an Addon Update
- How to Delete Old Events from WordPress Trash Automatically
- How To Upgrade From Lite to Full Version
- I am confused about Event Type categories
- What is the calendar filter
- Why am I unable to proceed with the checkout for addon purchases?