- Get Started
- User Guide
- How to
- ** How to use event_type category to do more
- How to Activate EventON
- How To Allow Users to Submit Events and Create an Events Listing Page
- How to apply a patch fix
- How to Bulk Update Language Translations Using the Import/Export Tool
- How to cancel addon subscription before auto renew
- How to Deactivate EventON Addon Licenses
- How To Display or Hide the Live Now Icon
- How to Enable Auto-updates for EventON
- How to find your EventON license key
- How to Fix a Broken Sidebar Caused by the EventON Widget
- How To Hide Blank Rows On the Calendar EventTop
- How To Set Up and Use the Filter Bar on Calendars
- How to Set Up Health Guidelines for EventON and Extend It
- How to Setup & Use Custom Fields for Events
- How to setup & use multi data types
- How to Setup Basic Paypal for Events
- How to show past events
- How to show your calendar on external sites using an iFrame
- How To Turn on Sort Options On Your Calendar
- How To Upgrade Your EventON Addon License
- How to Use Hashtags to Link to Event Sections
- How to Use Single Event Data Values
- How to Use the EventCard Designer
- How To Use the EventON Shortcode Executor(ESE) Widget
- How To Use The EventTop Designer
- How To Use the ICS Import Tool
- How to Use Virtual Visible Event End Time for Events with Limited Visibility but Extended Durations
- Using an SMTP Mail Plugin To Solve Email Delivery Issues in EventON
- General
- Basic System Requirements for EventON
- Best Practices Before Doing an Addon Update
- How to Delete Old Events from WordPress Trash Automatically
- How To Upgrade From Lite to Full Version
- I am confused about Event Type categories
- What is the calendar filter
- Why am I unable to proceed with the checkout for addon purchases?
- Troubleshooting
- ** What to check if eventON is not working
- How to debug for PHP code errors
- How to debug Javascript interactive issues
- How to find if an issue is coming from eventON
- How to fix font awesome icons not working on your site
- How to fix style override issues
- Increasing the WordPress Memory Limit
- Troubleshooting Using the Health Check Plugin
- Why is Location Google Map grayed out or not displayed on Event Card
- Virtual Events
- Frequently Asked Questions
- Code snippets
- CODE: To add additional healthcare guidelines
- How to add new social share icons
- How to change “events” slug & rewrites
- How to customize the eventtop date format
- How to hook into eventTop
- How to increase event type category count
- How to load EventON scripts to a page
- How to show additional custom data in the eventCard
- CODEX
- Event Post Meta Variables
- Hooks: Actions & Filters
- How to Add a Custom Event Status
- How to Customizing the Upcoming Events List on Event Taxonomy Archive Pages
- How to enable Plugin Editor for WordPress
- How to get more custom event data fields
- How to Include Additional Languages
- How to use Actions and Filters
- Taxonomies of EventON
- Template Tag: add_eventon
- Other
- Tricks and Tips
- ** Override CSS in your calendar
- How to create events that goes past midnight
- How to customize Events archive page
- How to customize location and organizer archive page
- How to override event colors with event type colors
- How to show featured image on eventTop
- How to show various information on the eventTop
- How to translate EventON with WPML on the front-end
- One solution for /events slug not working
- Various Creative Ways to Use Multi Data Types
- APIs
- Addons
- Action User
- ActionUser Paid Feature Events
- ActionUser Plus
- Advent Calendar
- Bookings
- Countdown
- CSV Importer
- DailyView
- Dynamic Pricing
- Event API
- Event Dynamic Pricing
- Event Lists
- Event Map
- Event Photos
- Event Reviewer
- Event Search
- Event Seats
- Event Slider
- Event Tickets
- Auto Complete Ticket Order
- Auto re-stocking refunded, cancelled or failed orders
- Changelog for Event Tickets
- CODE: How to send Emails as Bcc
- How to add additional data to confirmation email
- How to add additional fields at checkout
- How to add additional fields to download attendees CSV file
- How to customize ticket email template
- How to manage capacity separately for repeat events
- How to set up Event Tickets
- How to set up variable prices for Tickets
- How To Switch From WooCommerce Blocks to Shortcode-Based Cart & Checkout Pages
- Event Wishlist
- Filters Plus
- FullCal
- ICS Importer
- Include Anything
- Lists & Items
- Moon Data
- PDFer
- Polls
- QR Code
- Reminders
- Repeat Customizer
- RSS Feed
- RSVP Events
- RSVP Events Invitees
- RSVP Events Waitlist
- RSVP Points
- Single Events
- Speakers & Schedule
- Subscriber
- Sync Events
- Tickets Waitlist
- Variations & Options
- Virtual Plus
- Weather
- WeeklyView
- YearlyView
- Policies
- Server Related
- Shortcode
- Translation & Languages
Tickets Waitlist: Setup & Usage Guide
Last Updated: December 6, 2025
This documentation covers the setup, configuration, and usage of the EventON Tickets Waitlist addon. The addon enables waitlist functionality for sold-out event tickets, allowing customers to join a queue and receive automatic notifications when spaces become available (e.g., via refunds or admin stock adjustments).
Ticket Waitlist currently support only Simple tickets.
Prerequisites
- EventON Plugin (version 4.9+)
- EventON Tickets Addon (for ticket integration)
- WooCommerce (for stock management)
- WordPress 6.4+
- PHP 8.2+
Installation
- Download the addon ZIP from MyEventON.
- Upload via WordPress Admin → Plugins → Add New → Upload Plugin.
- Activate the plugin.
- Verify – Go to Plugins → look for “EventON – Tickets Waitlist” (active).
See How to install addons for more information.
Initial Setup
1. Enable Waitlist in EventON Settings
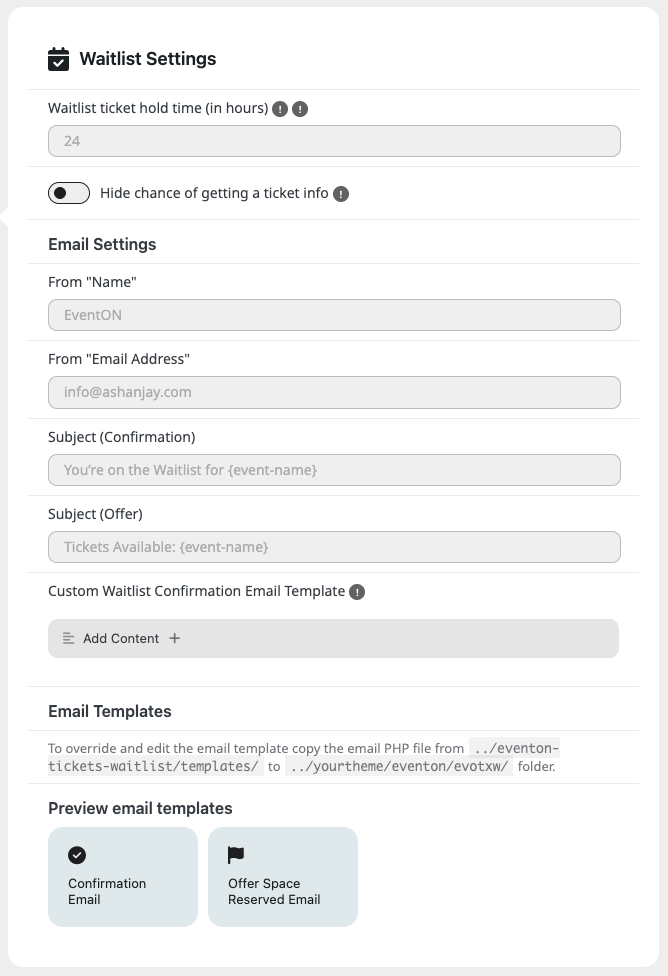
- Go to EventON → Settings → Tickets tab → Waitlist sub-tab.
- Set “Waitlist ticket hold time (hours)” (default: 24) – time reserved tickets stay locked.
2. Configure Settings

- Email Templates (optional):
- Confirmation Email: Customize from Custom Waitlist Confirmation Email Template (uses {{name}}, {{email}}, etc.).
- (Advanced) Template Override: You can copy email templates into {your-theme}/eventon/evotxw/ folder and customize the HTML structure of the emails.
- Preview Emails: Get a quick glance at how each email looks like with dummy content.
Per-Event Configuration
1. Create/Edit Event
- Go to Events → Add New or edit existing.
- In Event Tickets section:
- Add a Simple Ticket (waitlist only supports simple products).
- Set Stock Quantity (e.g., 10).
- Save the ticket.
2. Enable Waitlist
- In the Waitlist section (below tickets):
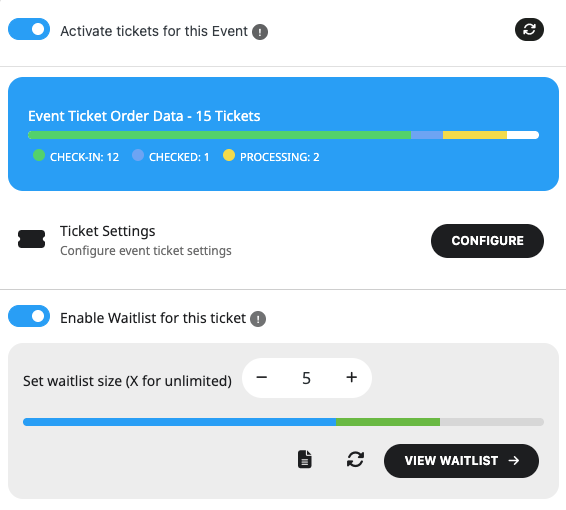
- Toggle “Enable Waitlist for this ticket” ON.
- Set “Waitlist Size” (X for unlimited).
- Save Event.

Note: Waitlist is only available for simple, non-repeating events. Repeating events show a note: “Waitlist does not support repeating events.”
Frontend Usage (Customer Side)
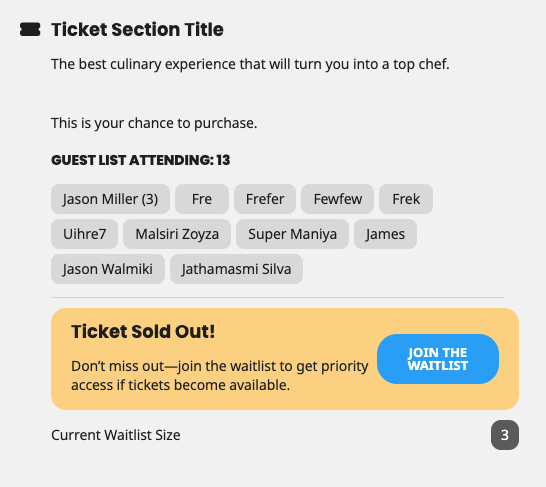
1. Sold-Out Event
- Customers see “Sold Out” on the event card.
- Below: “Join the Waitlist” button (if enabled).

2. Join Waitlist
- Click button → Lightbox form opens:
- First/Last Name (required)
- Email (required)
- Phone (optional)
- Party Size (default: 1)
- Submit → Confirmation message + position (e.g., “#3”).
- Email sent automatically (customizable template).
3. Receive Offer
- When space opens (refund/admin stock increase):
- First-come-first-served: First matching party size gets reserved.
- 24-hour hold (configurable).
- Email with “Tickets Available!” + purchase link.
4. Purchase Reserved Ticket
- Guests who received Space reserved email will be able to click special buy ticket link from the email.
- This link will unlock the reserved ticket for the guest, and they will be able to checkout.
Note: Once the reserved time is expired, the link will no longer allow guests to purchase tickets, and the tickets will be offered to another guest on waitlist or open to public.
Admin Usage
1. View Waitlist Entries
- Go to Events → Ticket Waitlist Entried (submenu).
2. Edit Entry
- Click entry → Meta Box: Guest info + status dropdown.
- Reserved Status:
- Reserved At/Expiries: Timestamps.
- Purchase Link: Opens event/ticket.
- Buttons: Preview Email, Resend, Resend to New Email.
- Manage Reservation Emails
- Preview: See email in lightbox.
- Resend: Re-sends offer to original email.
- Resend to New: Updates email + sends.
4. Waitlist Stats (Event Edit)

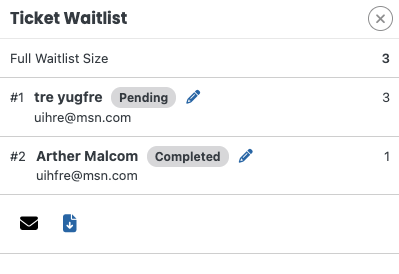
- In Waitlist Settings (event edit) click View Waitlist this will open a sidepanel with waitlist guests information.
- Waitlist Entries: You can find guest name, edit waitlist entry post, party size and other guest information.
- Email Waitlist: (Email Icon) will allow you to email the entire waitlist.
- CSV Download: (file download icon) will let you download the waitlist guest data as CSV file.
5. Logs
- In Waitlist Settings (Event Edit) → (File Icon) View Log: Shows timeline of offers, expirations, resends.
Troubleshooting
| Issue | Solution |
|---|---|
| Waitlist not showing | Enable in event → Waitlist → “Enable Waitlist for this ticket” ON. |
| No offers sent | Check cron (wp cron test) + settings → “Waitlist ticket hold time”. |
| Stock not unlocking | Validate token/email in query params. |
| Email not arriving | Check spam; test with wp_mail() debug. |
| Cron not running | Use WP Crontrol plugin to test evotxw_cleanup_reservations. |
Did this article help you?