- Get Started
- User Guide
- How to
- ** How to use event_type category to do more
- How to Activate EventON
- How To Allow Users to Submit Events and Create an Events Listing Page
- How to apply a patch fix
- How to Bulk Update Language Translations Using the Import/Export Tool
- How to cancel addon subscription before auto renew
- How to Deactivate EventON Addon Licenses
- How To Display or Hide the Live Now Icon
- How to Enable Auto-updates for EventON
- How to find your EventON license key
- How to Fix a Broken Sidebar Caused by the EventON Widget
- How To Hide Blank Rows On the Calendar EventTop
- How To Set Up and Use the Filter Bar on Calendars
- How to Set Up Health Guidelines for EventON and Extend It
- How to Setup & Use Custom Fields for Events
- How to setup & use multi data types
- How to Setup Basic Paypal for Events
- How to show past events
- How to show your calendar on external sites using an iFrame
- How To Turn on Sort Options On Your Calendar
- How To Upgrade Your EventON Addon License
- How to Use Hashtags to Link to Event Sections
- How to Use Single Event Data Values
- How to Use the EventCard Designer
- How To Use the EventON Shortcode Executor(ESE) Widget
- How To Use The EventTop Designer
- How To Use the ICS Import Tool
- How to Use Virtual Visible Event End Time for Events with Limited Visibility but Extended Durations
- Using an SMTP Mail Plugin To Solve Email Delivery Issues in EventON
- General
- Basic System Requirements for EventON
- Best Practices Before Doing an Addon Update
- How to Delete Old Events from WordPress Trash Automatically
- How To Upgrade From Lite to Full Version
- I am confused about Event Type categories
- What is the calendar filter
- Why am I unable to proceed with the checkout for addon purchases?
- Troubleshooting
- ** What to check if eventON is not working
- How to debug for PHP code errors
- How to debug Javascript interactive issues
- How to find if an issue is coming from eventON
- How to fix font awesome icons not working on your site
- How to fix style override issues
- Increasing the WordPress Memory Limit
- Troubleshooting Using the Health Check Plugin
- Why is Location Google Map grayed out or not displayed on Event Card
- Virtual Events
- Frequently Asked Questions
- Code snippets
- CODE: To add additional healthcare guidelines
- How to add new social share icons
- How to change “events” slug & rewrites
- How to customize the eventtop date format
- How to hook into eventTop
- How to increase event type category count
- How to load EventON scripts to a page
- How to show additional custom data in the eventCard
- CODEX
- Other
- Tricks and Tips
- ** Override CSS in your calendar
- How to create events that goes past midnight
- How to customize Events archive page
- How to customize location and organizer archive page
- How to override event colors with event type colors
- How to show featured image on eventTop
- How to show various information on the eventTop
- How to translate EventON with WPML on the front-end
- One solution for /events slug not working
- Various Creative Ways to Use Multi Data Types
- APIs
- Addons
- Action User
- ActionUser Paid Feature Events
- ActionUser Plus
- Advent Calendar
- Bookings
- Countdown
- CSV Importer
- DailyView
- Dynamic Pricing
- Event API
- Event Dynamic Pricing
- Event Lists
- Event Map
- Event Photos
- Event Reviewer
- Event Search
- Event Seats
- Event Slider
- Event Tickets
- Auto Complete Ticket Order
- Auto re-stocking refunded, cancelled or failed orders
- Changelog for Event Tickets
- CODE: How to send Emails as Bcc
- How to add additional data to confirmation email
- How to add additional fields at checkout
- How to add additional fields to download attendees CSV file
- How to customize ticket email template
- How to manage capacity separately for repeat events
- How to set up Event Tickets
- How to set up variable prices for Tickets
- How To Switch From WooCommerce Blocks to Shortcode-Based Cart & Checkout Pages
- Event Wishlist
- Filters Plus
- FullCal
- ICS Importer
- Include Anything
- Lists & Items
- Moon Data
- PDFer
- Polls
- QR Code
- Reminders
- Repeat Customizer
- RSS Feed
- RSVP Events
- RSVP Events Invitees
- RSVP Events Waitlist
- RSVP Points
- Single Events
- Speakers & Schedule
- Subscriber
- Sync Events
- Tickets Waitlist
- Variations & Options
- Virtual Plus
- Weather
- WeeklyView
- YearlyView
- Policies
- Server Related
- Shortcode
- Translation & Languages
Dynamic Pricing User Guide(Settings Overview)
Last Updated: February 21, 2025
Once the Dynamic Pricing addon is activated, head over to the events page and click to edit the event that you want to add dynamic pricing to. In this event edit page, under Tickets settings towards the bottom of that meta box, you will see a new option that will allow you to enable dynamic pricing for this event.
Important: At the moment, only simple Event tickets are supported with dynamic pricing. Variable tickets are NOT supported.

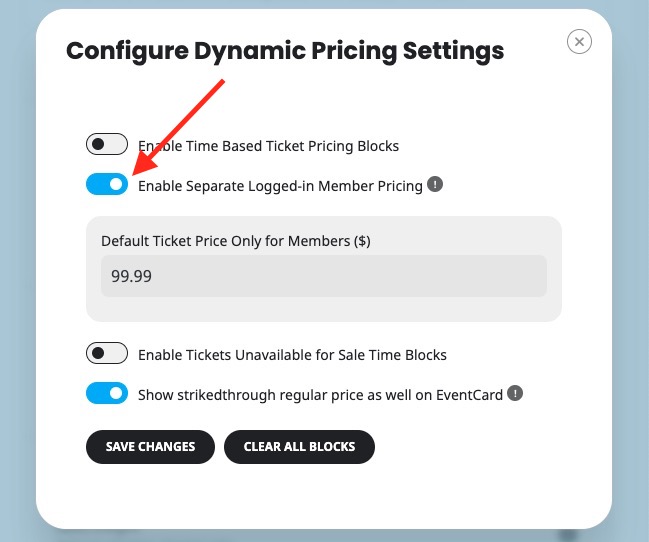
Once enabled you will see new options that come with the dynamic pricing addon.
1. Show striked-through regular price as well on EventCard
Enabling this option will change the regular price font style and add strike-through styling to the price.
2. Activate Separate Logged-in Member Pricing

Here you can define a special discount price for logged-in site users/members. Non-logged-in users will see the regular price.
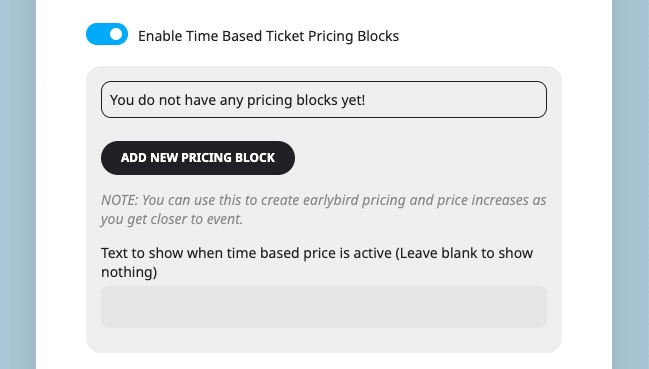
3. Activate Time Based Ticket Pricing Blocks

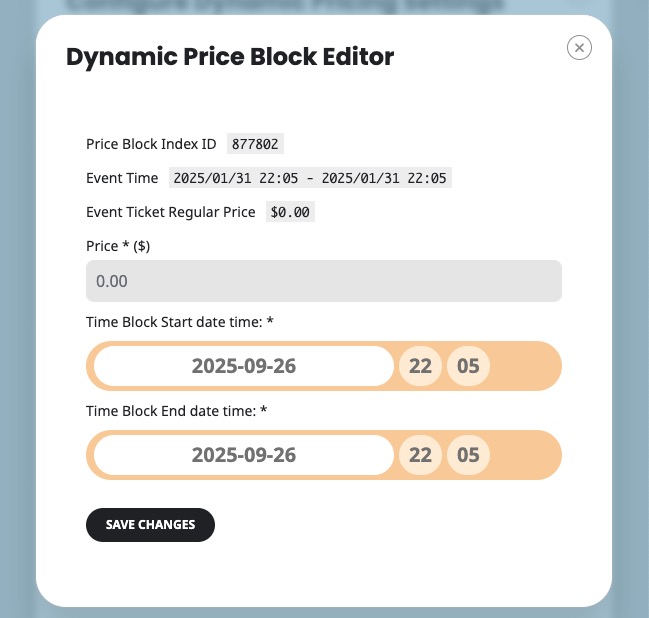
This option allows you to create time-based event pricing that changes as you draw closer to the event date and time. For example, you can configure the time blocks so that the ticket pricing goes up as you draw closer to the start of the event.
Add new pricing block button opens a lightbox form which you can use to configure the custom time blocks with dynamic pricing. The time blocks allow granular pricing that can be based on hours or days before the event.

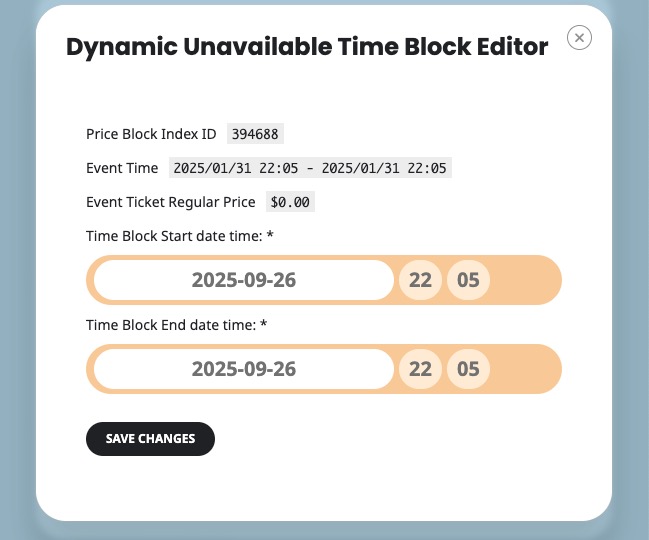
4. Activate Tickets Unavailable for Sale Time Blocks

This feature allows you to create time blocks in which tickets will be unavailable for purchase.
Add new unavailable time block button opens a lightbox where you can set the start and end time and date during which the event tickets will NOT be available for sale.

Did this article help you?