- Get Started
- User Guide
- How to
- ** How to use event_type category to do more
- How to Activate EventON
- How To Allow Users to Submit Events and Create an Events Listing Page
- How to apply a patch fix
- How to Bulk Update Language Translations Using the Import/Export Tool
- How to cancel addon subscription before auto renew
- How to Deactivate EventON Addon Licenses
- How To Display or Hide the Live Now Icon
- How to Enable Auto-updates for EventON
- How to find your EventON license key
- How to Fix a Broken Sidebar Caused by the EventON Widget
- How To Hide Blank Rows On the Calendar EventTop
- How To Set Up and Use the Filter Bar on Calendars
- How to Set Up Health Guidelines for EventON and Extend It
- How to Setup & Use Custom Fields for Events
- How to setup & use multi data types
- How to Setup Basic Paypal for Events
- How to show past events
- How to show your calendar on external sites using an iFrame
- How To Turn on Sort Options On Your Calendar
- How To Upgrade Your EventON Addon License
- How to Use Hashtags to Link to Event Sections
- How to Use Single Event Data Values
- How to Use the EventCard Designer
- How To Use the EventON Shortcode Executor(ESE) Widget
- How To Use The EventTop Designer
- How To Use the ICS Import Tool
- How to Use Virtual Visible Event End Time for Events with Limited Visibility but Extended Durations
- Using an SMTP Mail Plugin To Solve Email Delivery Issues in EventON
- General
- Basic System Requirements for EventON
- Best Practices Before Doing an Addon Update
- How to Delete Old Events from WordPress Trash Automatically
- How To Upgrade From Lite to Full Version
- I am confused about Event Type categories
- What is the calendar filter
- Why am I unable to proceed with the checkout for addon purchases?
- Troubleshooting
- ** What to check if eventON is not working
- How to debug for PHP code errors
- How to debug Javascript interactive issues
- How to find if an issue is coming from eventON
- How to fix font awesome icons not working on your site
- How to fix style override issues
- Increasing the WordPress Memory Limit
- Troubleshooting Using the Health Check Plugin
- Why is Location Google Map grayed out or not displayed on Event Card
- Virtual Events
- Frequently Asked Questions
- Code snippets
- CODE: To add additional healthcare guidelines
- How to add new social share icons
- How to change “events” slug & rewrites
- How to customize the eventtop date format
- How to hook into eventTop
- How to increase event type category count
- How to load EventON scripts to a page
- How to show additional custom data in the eventCard
- CODEX
- Event Post Meta Variables
- Hooks: Actions & Filters
- How to Add a Custom Event Status
- How to Customizing the Upcoming Events List on Event Taxonomy Archive Pages
- How to enable Plugin Editor for WordPress
- How to get more custom event data fields
- How to Include Additional Languages
- How to use Actions and Filters
- Taxonomies of EventON
- Template Tag: add_eventon
- Other
- Tricks and Tips
- ** Override CSS in your calendar
- How to create events that goes past midnight
- How to customize Events archive page
- How to customize location and organizer archive page
- How to override event colors with event type colors
- How to show featured image on eventTop
- How to show various information on the eventTop
- How to translate EventON with WPML on the front-end
- One solution for /events slug not working
- Various Creative Ways to Use Multi Data Types
- APIs
- Addons
- Action User
- ActionUser Paid Feature Events
- ActionUser Plus
- Advent Calendar
- Bookings
- Countdown
- CSV Importer
- DailyView
- Dynamic Pricing
- Event API
- Event Dynamic Pricing
- Event Lists
- Event Map
- Event Photos
- Event Reviewer
- Event Search
- Event Seats
- Event Slider
- Event Tickets
- Auto Complete Ticket Order
- Auto re-stocking refunded, cancelled or failed orders
- Changelog for Event Tickets
- CODE: How to send Emails as Bcc
- How to add additional data to confirmation email
- How to add additional fields at checkout
- How to add additional fields to download attendees CSV file
- How to customize ticket email template
- How to manage capacity separately for repeat events
- How to set up Event Tickets
- How to set up variable prices for Tickets
- How To Switch From WooCommerce Blocks to Shortcode-Based Cart & Checkout Pages
- Event Wishlist
- Filters Plus
- FullCal
- ICS Importer
- Include Anything
- Lists & Items
- Moon Data
- PDFer
- Polls
- QR Code
- Reminders
- Repeat Customizer
- RSS Feed
- RSVP Events
- RSVP Events Invitees
- RSVP Events Waitlist
- RSVP Points
- Single Events
- Speakers & Schedule
- Subscriber
- Sync Events
- Tickets Waitlist
- Variations & Options
- Virtual Plus
- Weather
- WeeklyView
- YearlyView
- Policies
- Server Related
- Shortcode
- Translation & Languages
How To Use the ICS Import Tool
Last Updated: February 11, 2025
EventON’s ICS import tool brings versatility by ensuring that events between your calendars remain in sync and helps to manage calendar events with ease and precision. In this guide, we will walk you through the step-by-step process of importing events from Outlook, iCalendar, and other calendar applications into your WordPress site. Once the events have been imported you can display them with ease using EventON’s shortcode generator.
User Guide
To get started, go to EventON > Settings > ICS Import.
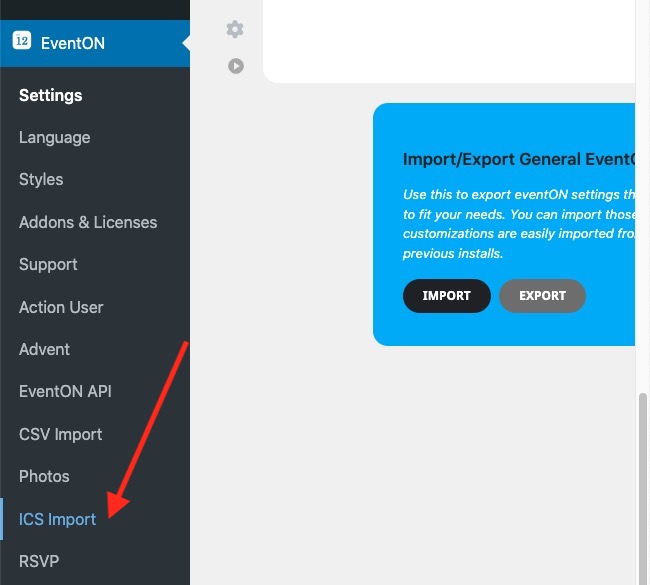
On this page, you can customize how the events will be imported into your site by toggling the following options:
- Publish imported events – When this setting is enabled, all the imported will get automatically published on your site. If your calendar is configured to display future and past events, then the imported events will be visible immediately.
- Event processing timezone method – This select dropdown allows you to select what timezone will be used for the imported events. You can select from the UTC timezone, WordPress timezone(Configured in WordPress > Settings > General > Timezone) or set this to the default timezone in the ICS file.
- Use custom timezone for importing events – Enabling this option allows you to select a custom timezone that will be applied to the imported events and override the setting above.
- Disable auto-detect all-day events based on ICS event time – This setting checks the timezone that is set on your WordPress site and uses this as a reference for all-day events. Enabling this option ensures that all-day events are not automatically detected so that you can manually configure them after the import.
- Enable duplication event name check during importing – Enabling this option will create a validation system that helps avoid having duplicate events on your site.
- Sync already imported events if event UID matches in the ICS file – Enabling this option allows you to sync existing events on your site with the data from the imported file.
- Import past events as well from ICS file – Enabling this option allows you to override the default behavior of the import tool and import past events based on the starting time.
- Import Method – This option allows you to select your import method of choice. You can select from doing the import manually from an ICS file, manual import using an ICS URL, or a scheduled event from an ICS URL. You can create a daily, weekly, or monthly schedule to import events from the URL.
Here are some guides on how to get the ICS link from popular programs.
- How to get ICS link from Google Calendar
- How to get iCal public calendar feed link
- How to get Outlook public calendar link
Import Process
For the purpose of this guide, we’ll go through the steps of importing events through a file.
Please select Manual import by uploading ICS File on the Import Method field.
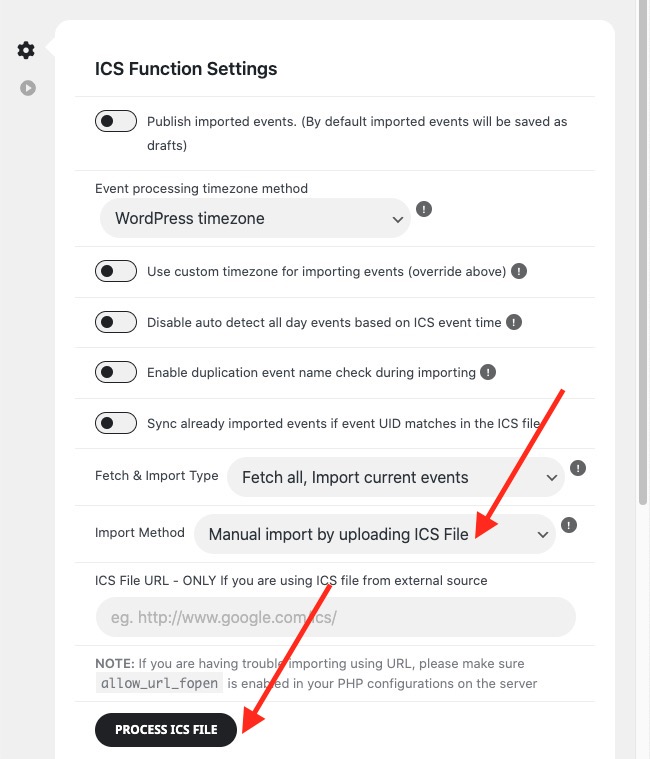
Export an ICS file from your external calendar application and click on the Process ICS File button.
In the next modal window, click on the Upload File button and select the ICS file that you exported in the previous step.
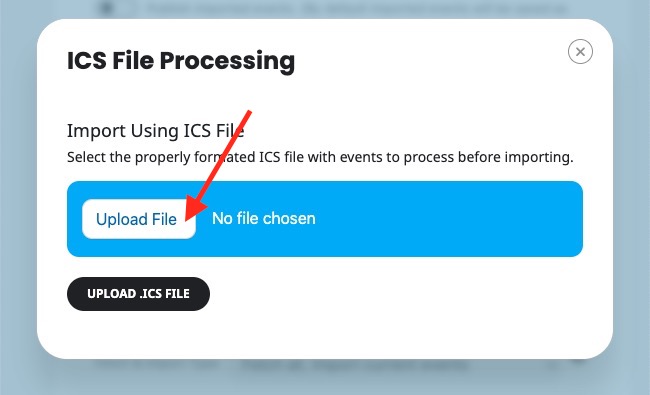
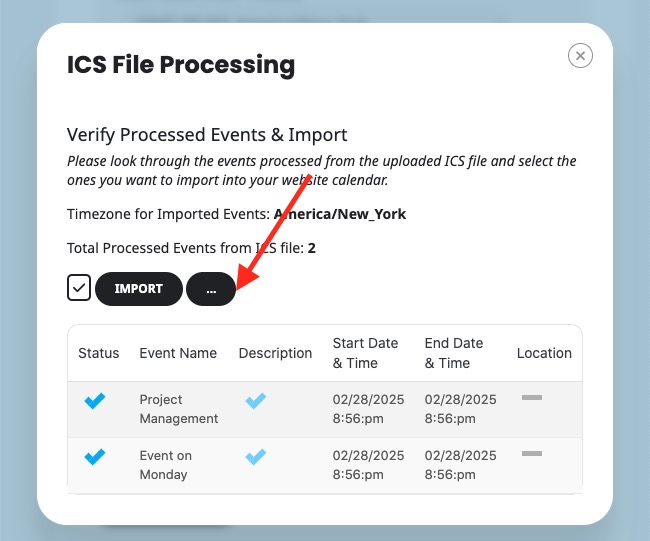
Next, click on the Upload .ICS file button to kickstart the import process. If the file passes validation and some events are found in the file, a new window will open containing a detailed list of the events as shown below:
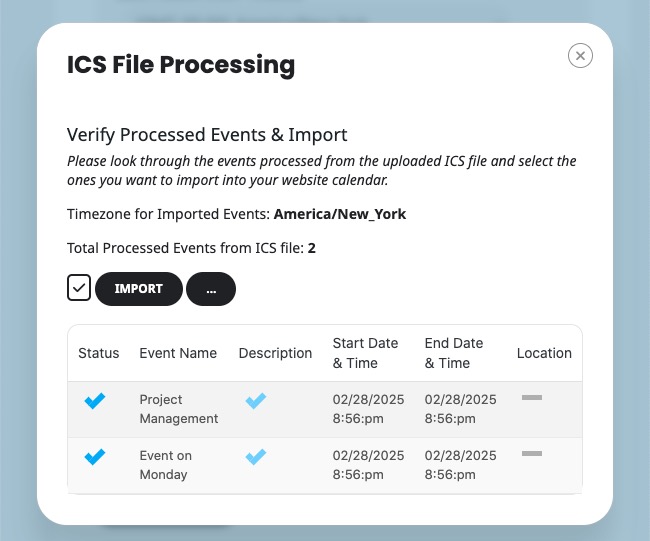
In this window, you can click on blue tick marks to deselect events that you’d not like to be imported. You can also expose more import options by clicking on the 3-dot button as shown below:
Once this button is clicked a drawer menu will slide in from the right side with the following settings:
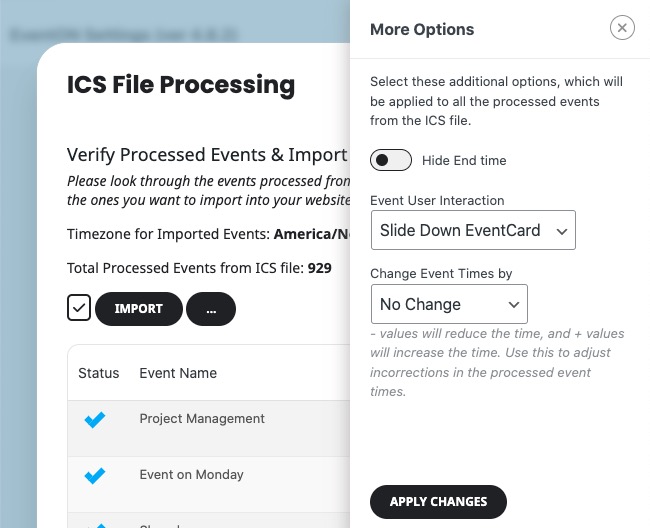
The additional settings allow you to customize the calendar with the following options:
- Hide end time – Enabling this option will hide the end times of all processed events.
- Event User Interaction – This setting allows you to select the kind of event that will happen after the event has been added to your calendar and a site visitor clicks on it.
- Change Event Times by – This field allows you to fine-tune the event time by adding negative or positive time offsets.
Did this article help you?
- How to
- ** How to use event_type category to do more
- How to Activate EventON
- How To Allow Users to Submit Events and Create an Events Listing Page
- How to apply a patch fix
- How to Bulk Update Language Translations Using the Import/Export Tool
- How to cancel addon subscription before auto renew
- How to Deactivate EventON Addon Licenses
- How To Display or Hide the Live Now Icon
- How to Enable Auto-updates for EventON
- How to find your EventON license key
- How to Fix a Broken Sidebar Caused by the EventON Widget
- How To Hide Blank Rows On the Calendar EventTop
- How To Set Up and Use the Filter Bar on Calendars
- How to Set Up Health Guidelines for EventON and Extend It
- How to Setup & Use Custom Fields for Events
- How to setup & use multi data types
- How to Setup Basic Paypal for Events
- How to show past events
- How to show your calendar on external sites using an iFrame
- How To Turn on Sort Options On Your Calendar
- How To Upgrade Your EventON Addon License
- How to Use Hashtags to Link to Event Sections
- How to Use Single Event Data Values
- How to Use the EventCard Designer
- How To Use the EventON Shortcode Executor(ESE) Widget
- How To Use The EventTop Designer
- How To Use the ICS Import Tool
- How to Use Virtual Visible Event End Time for Events with Limited Visibility but Extended Durations
- Using an SMTP Mail Plugin To Solve Email Delivery Issues in EventON