- Get Started
- User Guide
- How to
- ** How to use event_type category to do more
- How to Activate EventON
- How To Allow Users to Submit Events and Create an Events Listing Page
- How to apply a patch fix
- How to Bulk Update Language Translations Using the Import/Export Tool
- How to cancel addon subscription before auto renew
- How to Deactivate EventON Addon Licenses
- How To Display or Hide the Live Now Icon
- How to Enable Auto-updates for EventON
- How to find your EventON license key
- How to Fix a Broken Sidebar Caused by the EventON Widget
- How To Hide Blank Rows On the Calendar EventTop
- How To Set Up and Use the Filter Bar on Calendars
- How to Set Up Health Guidelines for EventON and Extend It
- How to Setup & Use Custom Fields for Events
- How to setup & use multi data types
- How to Setup Basic Paypal for Events
- How to show past events
- How to show your calendar on external sites using an iFrame
- How To Turn on Sort Options On Your Calendar
- How To Upgrade Your EventON Addon License
- How to Use Hashtags to Link to Event Sections
- How to Use Single Event Data Values
- How to Use the EventCard Designer
- How To Use the EventON Shortcode Executor(ESE) Widget
- How To Use The EventTop Designer
- How To Use the ICS Import Tool
- How to Use Virtual Visible Event End Time for Events with Limited Visibility but Extended Durations
- Using an SMTP Mail Plugin To Solve Email Delivery Issues in EventON
- General
- Basic System Requirements for EventON
- Best Practices Before Doing an Addon Update
- How to Delete Old Events from WordPress Trash Automatically
- How To Upgrade From Lite to Full Version
- I am confused about Event Type categories
- What is the calendar filter
- Why am I unable to proceed with the checkout for addon purchases?
- Troubleshooting
- ** What to check if eventON is not working
- How to debug for PHP code errors
- How to debug Javascript interactive issues
- How to find if an issue is coming from eventON
- How to fix font awesome icons not working on your site
- How to fix style override issues
- Increasing the WordPress Memory Limit
- Troubleshooting Using the Health Check Plugin
- Why is Location Google Map grayed out or not displayed on Event Card
- Virtual Events
- Frequently Asked Questions
- Code snippets
- CODE: To add additional healthcare guidelines
- How to add new social share icons
- How to change “events” slug & rewrites
- How to customize the eventtop date format
- How to hook into eventTop
- How to increase event type category count
- How to load EventON scripts to a page
- How to show additional custom data in the eventCard
- CODEX
- Event Post Meta Variables
- Hooks: Actions & Filters
- How to Add a Custom Event Status
- How to Customizing the Upcoming Events List on Event Taxonomy Archive Pages
- How to enable Plugin Editor for WordPress
- How to get more custom event data fields
- How to Include Additional Languages
- How to use Actions and Filters
- Taxonomies of EventON
- Template Tag: add_eventon
- Other
- Tricks and Tips
- ** Override CSS in your calendar
- How to create events that goes past midnight
- How to customize Events archive page
- How to customize location and organizer archive page
- How to override event colors with event type colors
- How to show featured image on eventTop
- How to show various information on the eventTop
- How to translate EventON with WPML on the front-end
- One solution for /events slug not working
- Various Creative Ways to Use Multi Data Types
- APIs
- Addons
- Action User
- ActionUser Paid Feature Events
- ActionUser Plus
- Advent Calendar
- Bookings
- Check-ins
- Countdown
- CSV Importer
- DailyView
- Dynamic Pricing
- Event API
- Event Dynamic Pricing
- Event Lists
- Event Map
- Event Photos
- Event Reviewer
- Event Search
- Event Seats
- Event Slider
- Event Tickets
- Auto Complete Ticket Order
- Auto re-stocking refunded, cancelled or failed orders
- Changelog for Event Tickets
- CODE: How to send Emails as Bcc
- How to add additional data to confirmation email
- How to add additional fields at checkout
- How to add additional fields to download attendees CSV file
- How to customize ticket email template
- How to manage capacity separately for repeat events
- How to set up Event Tickets
- How to set up variable prices for Tickets
- How To Switch From WooCommerce Blocks to Shortcode-Based Cart & Checkout Pages
- Event Wishlist
- Filters Plus
- FullCal
- ICS Importer
- Include Anything
- Lists & Items
- Moon Data
- PDFer
- Polls
- QR Code
- Reminders
- Repeat Customizer
- RSS Feed
- RSVP Events
- RSVP Events Invitees
- RSVP Events Waitlist
- RSVP Points
- Single Events
- Speakers & Schedule
- Subscriber
- Sync Events
- Tickets Waitlist
- Variations & Options
- Virtual Plus
- Weather
- WeeklyView
- YearlyView
- Policies
- Server Related
- Shortcode
- Translation & Languages
Quick Starter Guide
Last Updated: October 20, 2025
Get Up and Running with EventON in 15 Minutes!
Welcome to EventON! This quick guide helps new users install, configure, create events, and display a calendar on your WordPress site. Perfect for beginners, it covers the essentials to launch your first calendar fast. Let’s get started!
What You’ll Achieve:
- Install and activate EventON.
- Configure basic settings.
- Create and publish your first event.
- Add a calendar to your site.
Prerequisites:
- WordPress 5.0+ with admin access.
- A compatible theme (e.g., Twenty Twenty-Four).
- 15 minutes and an active internet connection.
For detailed guides, see our EventON Documentation.
Step 1: Install and Activate EventON
- Download EventON:
- Log in to your myEventON account and download the plugin ZIP file.
- Upload to WordPress:
- In your WordPress dashboard, go to Plugins > Add New > Upload Plugin.
- Select the ZIP file and click Install Now.
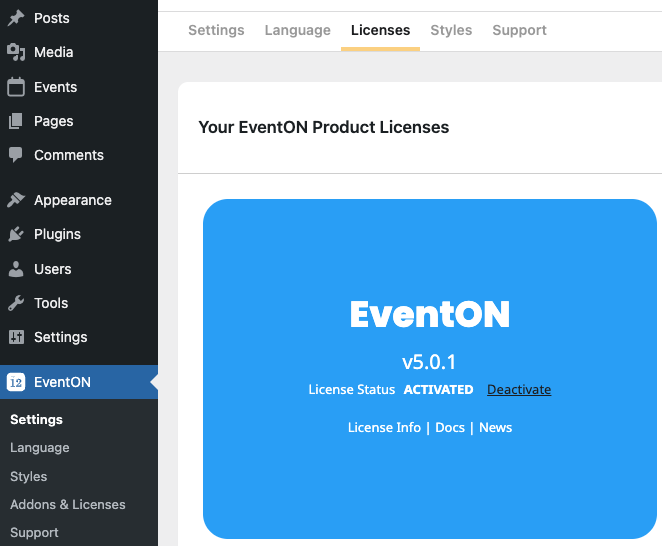
- Activate and License:
- Click Activate Plugin.
- Go to EventON > Addons & License, Click Activate, enter your license key (from your account) and email address, and click Activate.
“Note: If you see errors, check file permissions (755) or disable conflicting plugins. See Installation Guide.”
Read Extended Installation Guide.
Step 2: Configure Basic Settings
- Navigate to EventON > Settings in your dashboard.
- Time Settings Tab:
- Set your Default Time Zone under General Time/Date Settings (e.g., America/New_York).
- Set it to Apply default timezone to all events.
- Location Tab:
- Get and add Google maps API Key.
- Set Google starting zoom level for the map. (e.g., 18 – see few road, 7 – see most of the country)
- Enable Enable generate google maps from address for all newly created events, by default — this will enable google maps for new events by default.
- EventTop Tab:
- From EventTop Designer adjust and update desired eventTop layout. See EventTop Designer.
- EventCard Tab:
- Open EventCard Designer and configure the event card data layout and design. See EventCard Designer.
- Single Events Tab:
- Set single event page, eventTop design under Single Event Page > Select eventTop Style. (e.g., Immersive Flow, Colorful, or Clean White).
- Under Shareable Options enable social media channels for use.
- (Optional) Categories Tab:
- Re-name Event Type and Event Type 2 category (taxonomy) names from generic to custom names. (e.g., Genre or Style)
- Click Save Changes.
“Tip: Keep settings simple for now. You can tweak fonts or layouts later in Event Card Designer.”
Step 3: Create Your First Event
- Go to Events > Add New in the WordPress sidebar.
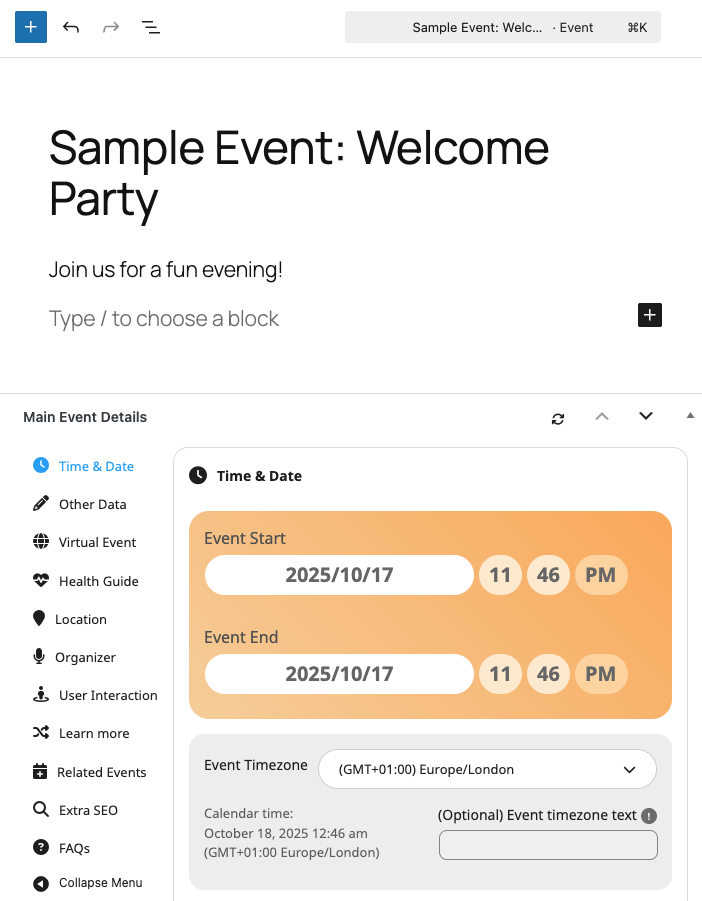
- Add Basic Info:
- Title: Enter “Sample Event: Welcome Party”.
- Description: Use the Gutenberg editor to add details (e.g., “Join us for a fun evening!”). Add images or links if desired.
- Event Details (metabox):
- Set Start Date/Time (e.g., tomorrow, 7:00 PM).
- Set End Date/Time (e.g., tomorrow, 9:00 PM).
- Important: Always set an end date to avoid display issues.
- Optional: Add a location (e.g., “123 Main St”) or organizer.
- Event Color: Click the color box, pick a shade (e.g., #FF5733 for orange).
- Featured Image (optional): Upload a 800x600px image for the event card.
- Click Publish in the top-right panel.
“Pro Tip: Test with a simple event first. Explore repeating events later in Repeating Events Guide.”
Read Extended Adding Events Guide.
Step 4: Add a Calendar to Your Site
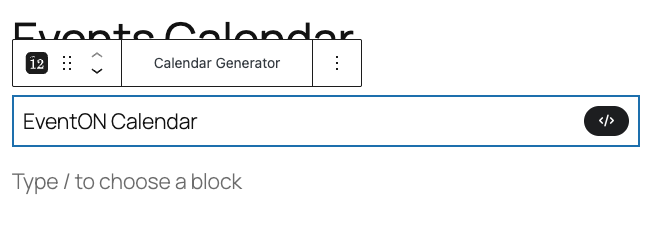
- Create a Page:
- Go to Pages > Add New.
- Title it “Events Calendar”.
- Insert Shortcode:
- In the Gutenberg editor, add a Shortcode block.
- Paste: [add_eventon show_et_ft_img=”yes” hide_past=”yes”]
- This displays a calendar with featured images, hiding past events.
- Alternative: Use Shortcode Generator:
- Click the Add EventON Shortcode button (Classic Editor) or EventON block (Gutenberg).
- Select options (e.g., Event Count Limit, Calendar User Interaction), Apply shortcode or copy the generated shortcode, and paste.
- See Extensive Guide: What is the Shortcode Generator?
- Click Publish to make the page live.
“Note: If the calendar doesn’t show, clear cache (e.g., WP Rocket) or check shortcode syntax. See General Shortcode Guide.”
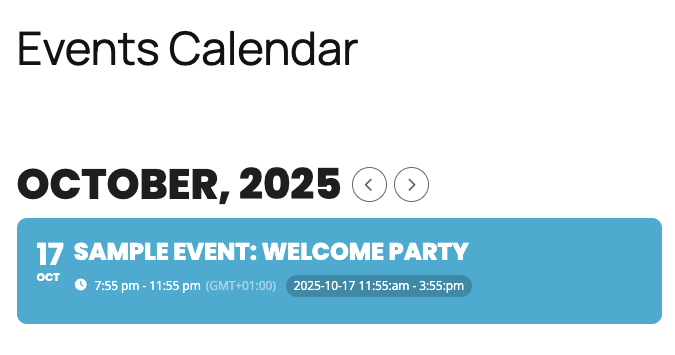
Step 5: Verify and Test
- Visit your new page (e.g., yoursite.com/events-calendar).
- Confirm your event appears with:
- Correct title, date, and image.
- Clickable details (e.g., slide-down event card).
- Test on mobile to ensure responsiveness.
- If issues arise:
- Check EventON settings are saved.
- Ensure the event isn’t filtered out (e.g., past events hidden).
- Disable other plugins to rule out conflicts.
Next Steps and Troubleshooting
- Enhance Events: Add FAQs, polls, or tickets via addons. See FAQs Guide.
- Customize Display: Adjust event card fields in Event Card Designer.
- Common Issues:
- No events visible? Verify shortcode, publish status, or date filters.
- Layout broken? Switch to a default theme to test.
- Slow load? Optimize images or enable caching.
- Explore More: Check our full documentation for advanced features like repeating events or integrations.
- Advance Uses: Utilize Multi Data Types and expand on event type categories.
Need help? Submit a support ticket or browse our Documentation. Welcome to EventON—start creating amazing calendars today!
Did this article help you?